与 Android Fragment 集成
与现有应用集成 的指南详细介绍了如何将全屏 React Native 应用作为 Activity 集成到现有的 Android 应用中。
¥The guide for Integration with Existing Apps details how to integrate a full-screen React Native app into an existing Android app as an Activity.
要在现有应用的 Fragment 中使用 React Native 组件,需要进行一些额外的设置。
¥To use React Native components within Fragments in an existing app requires some additional setup.
1. 将 React Native 添加到你的应用
¥ Add React Native to your app
请遵循 与现有应用集成 指南直至最后,以确保你可以在全屏 Activity 中安全地运行 React Native 应用。
¥Follow the guide for Integration with Existing Apps until the end to make sure you can safely run your React Native app in a full screen Activity.
2. 为 React Native Fragment 添加 FrameLayout
¥ Add a FrameLayout for the React Native Fragment
在此示例中,我们将使用 FrameLayout 将 React Native Fragment 添加到 Activity。这种方法足够灵活,可以适应在其他布局(例如底部表格或选项卡布局)中使用 React Native。
¥In this example, we're going to use a FrameLayout to add a React Native Fragment to an Activity. This approach is flexible enough and can be adapted to use React Native in other layouts such as Bottom Sheets or Tab Layouts.
首先将具有 id、宽度和高度的 <FrameLayout> 添加到 Activity 的布局中(例如 res/layouts 文件夹中的 main_activity.xml)。这是你将找到的用于渲染 React Native Fragment 的布局。
¥First add a <FrameLayout> with an id, width and height to your Activity's layout (e.g. main_activity.xml in the res/layouts folder). This is the layout you will find to render your React Native Fragment.
<FrameLayout
    android:id="@+id/react_native_fragment"
    android:layout_width="match_parent"
    android:layout_height="match_parent" />
3. 让你的主机 Activity 实现 DefaultHardwareBackBtnHandler
¥ Make your host Activity implement DefaultHardwareBackBtnHandler
由于你的主机活动不是 ReactActivity,因此你需要实现 DefaultHardwareBackBtnHandler 接口来处理后退按钮按下事件。这是 React Native 处理后退按钮按下事件所必需的。
¥As your host activity is not a ReactActivity, you need to implement the DefaultHardwareBackBtnHandler interface to handle the back button press event.
This is required by React Native to handle the back button press event.
进入你的主机活动并确保它实现了 DefaultHardwareBackBtnHandler 接口:
¥Go into your host activity and make sure it implements the DefaultHardwareBackBtnHandler interface:
Activity.onBackPressed() 自 API 级别 33 起变为 deprecated。对于 Android 16 设备,如果应用的目标 API 级别为 36,则应改用 不再被调用 和 OnBackPressedDispatcher。
¥Activity.onBackPressed() has been deprecated since API level 33. Android 16 devices with apps targeting API level 36 this will no longer be called and OnBackPressedDispatcher should be used instead.
- Java
- Kotlin
package <your-package-here>

import android.os.Bundle
import androidx.appcompat.app.AppCompatActivity
+import com.facebook.react.modules.core.DefaultHardwareBackBtnHandler

+class MainActivity : AppCompatActivity() {
+class MainActivity : AppCompatActivity(), DefaultHardwareBackBtnHandler {

    override fun onCreate(savedInstanceState: Bundle?) {
        super.onCreate(savedInstanceState)
        setContentView(R.layout.main_activity)

        findViewById<Button>(R.id.sample_button).setOnClickListener {
            // Handle button click
        }
    }

+   override fun invokeDefaultOnBackPressed() {
+       onBackPressedDispatcher.onBackPressed()
+   }
}
package <your-package-here>;

import android.os.Bundle;
import androidx.appcompat.app.AppCompatActivity;
+import com.facebook.react.modules.core.DefaultHardwareBackBtnHandler;

-class MainActivity extends AppCompatActivity {
+class MainActivity extends AppCompatActivity implements DefaultHardwareBackBtnHandler {

    @Override
    protected void onCreate(@Nullable Bundle savedInstanceState) {
        super.onCreate(savedInstanceState);
        setContentView(R.layout.main_activity);

        findViewById(R.id.button_appcompose).setOnClickListener(button -> {
            // Handle button click
        });
    }

+   @Override
+   public void invokeDefaultOnBackPressed() {
+       getOnBackPressedDispatcher().onBackPressed();
+   }
}
4. 将 React Native 片段添加到 FrameLayout
¥ Add a React Native Fragment to the FrameLayout
最后,我们可以更新 Activity,将 React Native Fragment 添加到 FrameLayout。在此特定示例中,我们假设你的 Activity 有一个 id 为 sample_button 的按钮,单击该按钮时会将 React Native Fragment 渲染到 FrameLayout 中。
¥Finally, we can update the Activity to add a React Native Fragment to the FrameLayout.
In this specific example, we're going to assume that your Activity has a button with id sample_button that when clicked will render a React Native Fragment into the FrameLayout.
更新你的 Activity 的 onCreate 方法,如下所示:
¥Update your Activity's onCreate method as follows:
- Java
- Kotlin
package <your-package-here>

import android.os.Bundle
import androidx.appcompat.app.AppCompatActivity
+import com.facebook.react.ReactFragment
import com.facebook.react.modules.core.DefaultHardwareBackBtnHandler

public class MainActivity : AppCompatActivity(), DefaultHardwareBackBtnHandler {

    override fun onCreate(savedInstanceState: Bundle?) {
        super.onCreate(savedInstanceState)
        setContentView(R.layout.main_activity)

        findViewById<Button>(R.id.sample_button).setOnClickListener {
+           val reactNativeFragment = ReactFragment.Builder()
+               .setComponentName("HelloWorld")
+               .setLaunchOptions(Bundle().apply { putString("message", "my value") })
+               .build()
+           supportFragmentManager
+               .beginTransaction()
+               .add(R.id.react_native_fragment, reactNativeFragment)
+               .commit()
        }
    }

   override fun invokeDefaultOnBackPressed() {
       super.onBackPressed()
   }
}
package <your-package-here>;

import android.os.Bundle;
import androidx.appcompat.app.AppCompatActivity;
+import com.facebook.react.ReactFragment;
import com.facebook.react.modules.core.DefaultHardwareBackBtnHandler;

public class MainActivity extends AppCompatActivity implements DefaultHardwareBackBtnHandler {

    @Override
    protected void onCreate(@Nullable Bundle savedInstanceState) {
        super.onCreate(savedInstanceState);
        setContentView(R.layout.main_activity);

        findViewById(R.id.button_appcompose).setOnClickListener(button -> {
+           Bundle launchOptions = new Bundle();
+           launchOptions.putString("message", "my value");
+
+           ReactFragment fragment = new ReactFragment.Builder()
+                   .setComponentName("HelloWorld")
+                   .setLaunchOptions(launchOptions)
+                   .build();
+           getSupportFragmentManager()
+                   .beginTransaction()
+                   .add(R.id.react_native_fragment, fragment)
+                   .commit();
        });
    }

    @Override
    public void invokeDefaultOnBackPressed() {
        super.onBackPressed();
    }
}
让我们看看上面的代码。
¥Let's look at the code above.
ReactFragment.Builder() 用于创建一个新的 ReactFragment,然后我们使用 supportFragmentManager 将该 Fragment 添加到 FrameLayout。
¥The ReactFragment.Builder() is used to create a new ReactFragment and then we use the supportFragmentManager to add that Fragment to the FrameLayout.
在构建器中,你可以自定义片段的创建方式:
¥Inside the builder you can customize how the fragment is created:
-
setComponentName是你要渲染的组件的名称。它与registerComponent方法中的index.js中指定的字符串相同。¥
setComponentNameis the name of the component you want to render. It's the same string specified in yourindex.jsinside theregisterComponentmethod. -
setLaunchOptions是一种可选方法,用于将初始属性传递给你的组件。这是可选的,如果不使用,可以将其删除。¥
setLaunchOptionsis an optional method to pass initial props to your component. This is optional and you can remove it if you don't use it.
5. 测试你的集成
¥ Test your integration
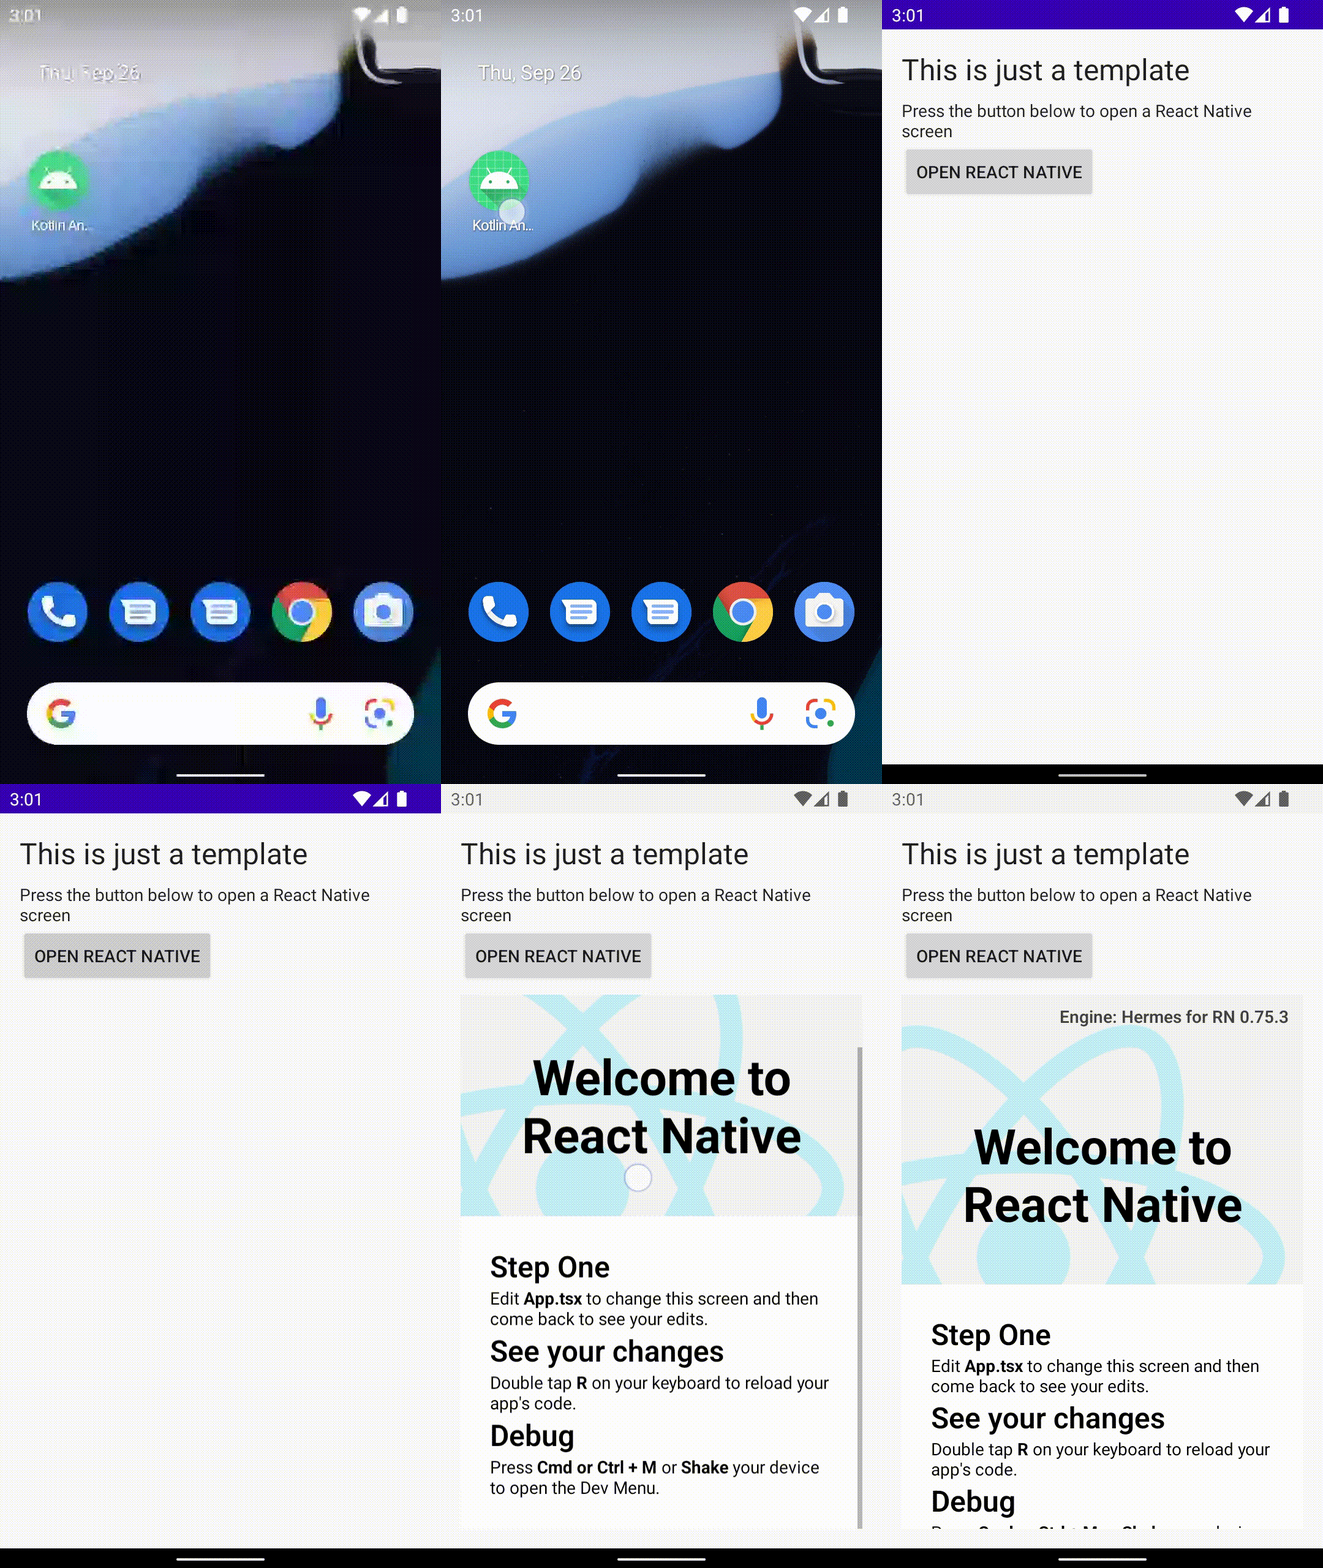
确保运行 yarn start 来运行打包程序,然后在 Android Studio 中运行你的 android 应用。应用应从开发服务器加载 JavaScript/TypeScript 代码并将其显示在 Activity 中的 React Native Fragment 中。
¥Make sure you run yarn start to run the bundler and then run your android app in Android Studio. The app should load the JavaScript/TypeScript code from the development server and display it in your React Native Fragment in the Activity.
你的应用应该看起来像这样:
¥Your app should look like this one:
