加快构建阶段
构建 React Native 应用可能成本高昂,并且需要开发者花费几分钟的时间。随着你的项目不断增长,并且通常在拥有多个 React Native 开发者的大型组织中,这可能会出现问题。
¥Building your React Native app could be expensive and take several minutes of developers time. This can be problematic as your project grows and generally in bigger organizations with multiple React Native developers.
为了减轻这种性能影响,本页面分享了一些有关如何缩短构建时间的建议。
¥To mitigate this performance hit, this page shares some suggestions on how to improve your build time.
请注意,这些建议是高级功能,需要对原生构建工具的工作原理有所了解。
¥Please note that those suggestions are advanced feature that requires some amount of understanding of how the native build tools work.
开发期间仅构建一个 ABI(仅限 Android)
¥Build only one ABI during development (Android-only)
在本地构建 Android 应用时,默认情况下会构建所有 4 个 应用二进制接口 (ABI):armeabi-v7a、arm64-v8a、x86 和 x86_64。
¥When building your android app locally, by default you build all the 4 Application Binary Interfaces (ABIs) : armeabi-v7a, arm64-v8a, x86 & x86_64.
但是,如果你在本地构建并测试模拟器或在物理设备上,则可能不需要构建所有这些。
¥However, you probably don't need to build all of them if you're building locally and testing your emulator or on a physical device.
这应该会将你的原生构建时间减少约 75%。
¥This should reduce your native build time by a ~75% factor.
如果你使用的是 React Native CLI,则可以将 --active-arch-only 标志添加到 run-android 命令中。此标志将确保从正在运行的模拟器或插入的手机中获取正确的 ABI。为了确认此方法工作正常,你将在控制台上看到类似 info Detected architectures arm64-v8a 的消息。
¥If you're using the React Native CLI, you can add the --active-arch-only flag to the run-android command. This flag will make sure the correct ABI is picked up from either the running emulator or the plugged in phone. To confirm that this approach is working fine, you'll see a message like info Detected architectures arm64-v8a on console.
$ yarn react-native run-android --active-arch-only

[ ... ]
info Running jetifier to migrate libraries to AndroidX. You can disable it using "--no-jetifier" flag.
Jetifier found 1037 file(s) to forward-jetify. Using 32 workers...
info JS server already running.
info Detected architectures arm64-v8a
info Installing the app...
此机制依赖于 reactNativeArchitectures Gradle 属性。
¥This mechanism relies on the reactNativeArchitectures Gradle property.
因此,如果你直接从命令行使用 Gradle 进行构建而不使用 CLI,则可以指定要构建的 ABI,如下所示:
¥Therefore, if you're building directly with Gradle from the command line and without the CLI, you can specify the ABI you want to build as follows:
$ ./gradlew :app:assembleDebug -PreactNativeArchitectures=x86,x86_64
如果你希望在 CI 上构建 Android 应用并使用矩阵来并行构建不同架构,这会很有用。
¥This can be useful if you wish to build your Android App on a CI and use a matrix to parallelize the build of the different architectures.
如果你愿意,你还可以使用项目 顶层文件夹 中的 gradle.properties 文件在本地覆盖此值:
¥If you wish, you can also override this value locally, using the gradle.properties file you have in the top-level folder of your project:
# Use this property to specify which architecture you want to build.
# You can also override it from the CLI using
# ./gradlew <task> -PreactNativeArchitectures=x86_64
reactNativeArchitectures=armeabi-v7a,arm64-v8a,x86,x86_64
一旦你构建了应用的发布版本,请不要忘记删除这些标志,因为你想要构建适用于所有 ABI 而不仅仅是你在日常开发工作流程中使用的 ABI 的 apk/应用包。
¥Once you build a release version of your app, don't forget to remove those flags as you want to build an apk/app bundle that works for all the ABIs and not only for the one you're using in your daily development workflow.
启用配置缓存(仅限 Android)
¥Enable Configuration Caching (Android-only)
从 React Native 0.79 版本开始,你还可以启用 Gradle 配置缓存。
¥Since React Native 0.79, you can also enable Gradle Configuration Caching.
当你使用 yarn android 运行 Android 构建时,你将执行由两个步骤 (source) 组成的 Gradle 构建:
¥When you’re running an Android build with yarn android, you will be executing a Gradle build that is composed by two steps (source):
-
配置阶段,所有
.gradle文件均已评估。¥Configuration phase, when all the
.gradlefiles are evaluated. -
执行阶段,实际执行任务,编译 Java/Kotlin 代码等等。
¥Execution phase, when the tasks are actually executed so the Java/Kotlin code is compiled and so on.
现在你可以启用配置缓存,这将允许你在后续构建中跳过配置阶段。
¥You will now be able to enable Configuration Caching, which will allow you to skip the Configuration phase on subsequent builds.
这在频繁更改原生代码时非常有用,因为它可以缩短构建时间。
¥This is beneficial when making frequent changes to the native code as it improves build times.
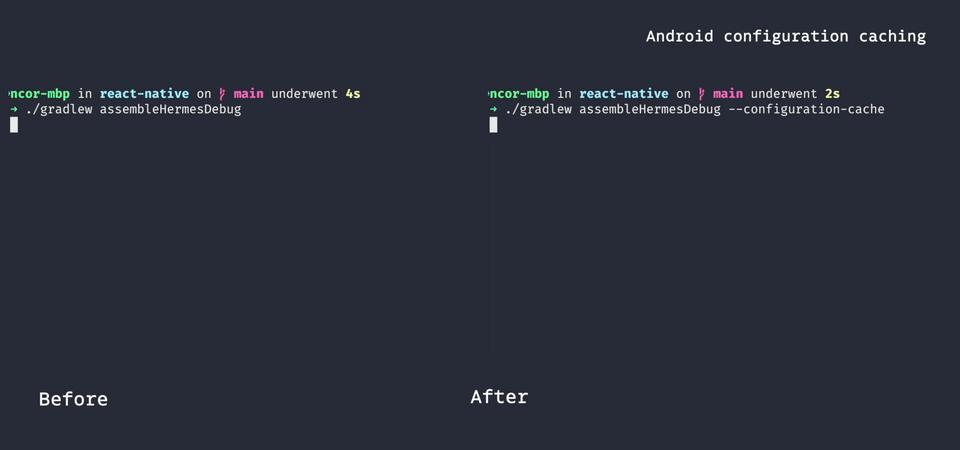
例如,你可以在此处看到在更改原生代码后重建 RN-Tester 的速度有多快:
¥For example here you can see how rebuilding faster it is to rebuild RN-Tester after a change in the native code:
你可以通过在 android/gradle.properties 文件中添加以下行来启用 Gradle 配置缓存:
¥You can enable Gradle Configuration Caching by adding the following line in your android/gradle.properties file:
org.gradle.configuration-cache=true
有关配置缓存的更多资源,请参阅 官方 Gradle 文档。
¥Please refer to the official Gradle documentation for more resources on Configuration Caching.
使用 Maven 镜像(仅限 Android)
¥Using a Maven Mirror (Android-only)
构建 Android 应用时,你的 Gradle 构建需要从 Maven Central 和互联网上的其他代码库下载必要的依赖。
¥When building Android apps, your Gradle builds will need to download the necessary dependencies from Maven Central and other repositories from the internet.
如果你的组织正在运行 Maven 仓库镜像,你应该考虑使用它,因为它可以加快构建速度,因为它可以从镜像而不是从互联网下载工件。
¥If your organization is running a Maven repository mirror, you should consider using it as it will speed up your build, by downloading the artifacts from the mirror rather than from the internet.
你可以通过在 android/gradle.properties 文件中指定 exclusiveEnterpriseRepository 属性来配置镜像:
¥You can configure a mirror by specifying the exclusiveEnterpriseRepository property in your android/gradle.properties file:
# Use this property to enable or disable the Hermes JS engine.
# If set to false, you will be using JSC instead.
hermesEnabled=true

# Use this property to configure a Maven enterprise repository
# that will be used exclusively to fetch all of your dependencies.
+exclusiveEnterpriseRepository=https://my.internal.proxy.net/
设置此属性后,你的构建将仅从你指定的代码库中获取依赖,而不会从其他代码库中获取。
¥By setting this property, your build will fetch dependencies exclusively from your specified repository and not from others.
使用编译器缓存
¥Use a compiler cache
如果你经常运行原生构建(C++ 或 Objective-C),你可能会从使用编译器缓存中受益。
¥If you're running frequent native builds (either C++ or Objective-C), you might benefit from using a compiler cache.
具体来说,你可以使用两种类型的缓存:本地编译器缓存和分布式编译器缓存。
¥Specifically you can use two type of caches: local compiler caches and distributed compiler caches.
本地缓存
¥Local caches
以下说明适用于 Android 和 iOS。如果你只构建 Android 应用,那么你应该可以开始了。如果你还构建 iOS 应用,请按照下面的 Xcode 特定设置 部分中的说明进行操作。
¥The following instructions will work for both Android & iOS. If you're building only Android apps, you should be good to go. If you're building also iOS apps, please follow the instructions in the Xcode Specific Setup section below.
我们建议使用 ccache 来缓存原生构建的编译。Ccache 的工作原理是封装 C++ 编译器,存储编译结果,如果最初存储了中间编译结果,则跳过编译。
¥We suggest to use ccache to cache the compilation of your native builds. Ccache works by wrapping the C++ compilers, storing the compilation results, and skipping the compilation if an intermediate compilation result was originally stored.
Ccache 在大多数操作系统的包管理器中可用。在 macOS 上,我们可以使用 brew install ccache 安装 ccache。或者你可以按照 官方安装说明 从源代码安装。
¥Ccache is available in the package manager for most operating systems. On macOS, we can install ccache with brew install ccache.
Or you can follow the official installation instructions to install from source.
然后,你可以进行两次干净的构建(例如,在 Android 上,你可以首先运行 yarn react-native run-android,删除 android/app/build 文件夹,然后再次运行第一个命令)。你会注意到第二个构建比第一个构建快得多(应该需要几秒钟而不是几分钟)。构建时,你可以验证 ccache 是否正常工作并检查缓存命中/未命中率 ccache -s
¥You can then do two clean builds (e.g. on Android you can first run yarn react-native run-android, delete the android/app/build folder and run the first command once more). You will notice that the second build was way faster than the first one (it should take seconds rather than minutes).
While building, you can verify that ccache works correctly and check the cache hits/miss rate ccache -s
$ ccache -s
Summary:
  Hits:             196 /  3068 (6.39 %)
    Direct:           0 /  3068 (0.00 %)
    Preprocessed:   196 /  3068 (6.39 %)
  Misses:          2872
    Direct:        3068
    Preprocessed:  2872
  Uncacheable:        1
Primary storage:
  Hits:             196 /  6136 (3.19 %)
  Misses:          5940
  Cache size (GB): 0.60 / 20.00 (3.00 %)
请注意,ccache 汇总了所有构建的统计信息。你可以在构建之前使用 ccache --zero-stats 重置它们以验证缓存命中率。
¥Note that ccache aggregates the stats over all builds. You can use ccache --zero-stats to reset them before a build to verify the cache-hit ratio.
如果你需要擦除缓存,可以使用 ccache --clear 来执行此操作
¥Should you need to wipe your cache, you can do so with ccache --clear
Xcode 特定设置
¥Xcode Specific Setup
为确保 ccache 在 iOS 和 Xcode 上正常运行,你需要在 ios/Podfile 中启用 React Native 对 ccache 的支持。
¥To make sure ccache works correctly with iOS and Xcode, you need to enable React Native support for ccache in ios/Podfile.
在编辑器中打开 ios/Podfile 并取消注释 ccache_enabled 行。
¥Open ios/Podfile in your editor and uncomment the ccache_enabled line.
  post_install do |installer|
    # https://github.com/facebook/react-native/blob/main/packages/react-native/scripts/react_native_pods.rb#L197-L202
    react_native_post_install(
      installer,
      config[:reactNativePath],
      :mac_catalyst_enabled => false,
      # TODO: Uncomment the line below
      :ccache_enabled => true
    )
  end
在 CI 上使用此方法
¥Using this approach on a CI
Ccache 使用 macOS 上的 /Users/$USER/Library/Caches/ccache 文件夹来存储缓存。因此,你也可以在 CI 上保存和恢复相应的文件夹,以加快构建速度。
¥Ccache uses the /Users/$USER/Library/Caches/ccache folder on macOS to store the cache.
Therefore you could save & restore the corresponding folder also on CI to speedup your builds.
但是,有几点需要注意:
¥However, there are a couple of things to be aware:
-
在 CI 上,我们建议进行完全干净的构建,以避免缓存中毒问题。如果你遵循上一段中提到的方法,你应该能够在 4 个不同的 ABI 上并行化原生构建,并且你很可能不需要 CI 上的
ccache。¥On CI, we recommend to do a full clean build, to avoid poisoned cache problems. If you follow the approach mentioned in the previous paragraph, you should be able to parallelize the native build on 4 different ABIs and you will most likely not need
ccacheon CI. -
ccache依赖时间戳来计算缓存命中。这在 CI 上效果不佳,因为每次 CI 运行时都会重新下载文件。为了克服这个问题,你需要使用compiler_check content选项,它依赖于 对文件内容进行哈希处理。¥
ccacherelies on timestamps to compute a cache hit. This doesn't work well on CI as files are re-downloaded at every CI run. To overcome this, you'll need to use thecompiler_check contentoption which relies instead on hashing the content of the file.
分布式缓存
¥Distributed caches
与本地缓存类似,你可能需要考虑在原生构建中使用分布式缓存。这对于经常进行原生构建的大型组织特别有用。
¥Similar to local caches, you might want to consider using a distributed cache for your native builds. This could be specifically useful in bigger organizations that are doing frequent native builds.
我们建议使用 sccache 来实现此目的。我们遵循 sccache 分布式编译快速入门 以获取有关如何设置和使用此工具的说明。
¥We recommend to use sccache to achieve this. We defer to the sccache distributed compilation quickstart for instructions on how to setup and use this tool.